Tips & Tutorials
____________________________
Table of Contents
Astrophotography with the Nyx Tracker
____________________________
Astrophotography with the Nyx Tracker
Welcome to astrophotography with the Nyx Tracker! This page is designed to supplement the user manual that comes with the Nyx Tracker, going into far more depth about how to get the best results.
It is important to understand that the Nyx Tracker is designed for widefield astrophotography less than focal lengths of 100 mm. We recommend that beginners start out with focal lengths closer to 25 mm, as longer focal lengths make each step of the imaging process more difficult. [1]
The basic idea behind tracked astrophotography is to take the longest exposures possible by counteracting the earth's rotation so that the stars do not move across your image plane, smearing your image. Longer exposures increase your signal to noise ratio. [2] Of course, you don't hear of many astrophotographers taking single exposures an hour long. In fact, the vast majority of amateur images end up being just a couple of minutes. Why not take images an hour long? Well, you would if you could, but it's incredibly difficult to keep your setup stable throughout such a long exposure so that the resulting image doesn't come out blurry or smeared. Adequate alignment of your mount's polar axis to the celestial pole also becomes more difficult the longer you expose. [3]
By focusing on stability and alignment, you will be able to get good images the most quickly. The following sections will explain these concepts.
Stability
A good imaging setup will ensure that the camera does not shake, vibrate, or otherwise move throughout single exposures, and ideally throughout the entire imaging session. Small perturbations not normally felt by a person will be magnified many times over and easily seen on resulting images, so look at your exposures carefully to gauge how well you are doing. [3a]
Location:
A stable platform on which to place your tripod and camera setup is essential. The bed of a truck is not stable, nor is the roof of a house, or even a bridge, as large as it may be. These platforms all shift, sway, and vibrate due to the effects of nearby vehicles, people, and wind. The best platforms are concrete, asphalt, stone that are not near sources of vibration or movement.
Tripod:
A cheap, rickety tripod may be acceptable for daytime photos on vacation, but will lead to frustration when performing astrophotography. A sturdy tripod that allows for smooth adjustments is a good investment. This tripod is one we often recommend.
If all you have is a budget tripod, you can make it more stable by attaching some weights to its center post.

Image credit: dpmag.com
Camera Balancing:
Once you've selected a good platform and a good tripod, your last major step is to properly balance your camera on the tracker. The idea is to keep the center of mass of your camera and lens directly above the ballhead on your tracker, or as close to that point as reasonably possible. This reduces the stress on the ball head joint and the tracker's driving mechanism, reducing the effects of perturbations and the possibility of the equipment "settling" over time. For heavier cameras this is more essential; lighter payloads can get away with more imbalance.
The tracker itself can be oriented in an infinite number of ways, so long as it is balanced fairly well. See the gallery page for a variety of examples of good setups.

Alignment
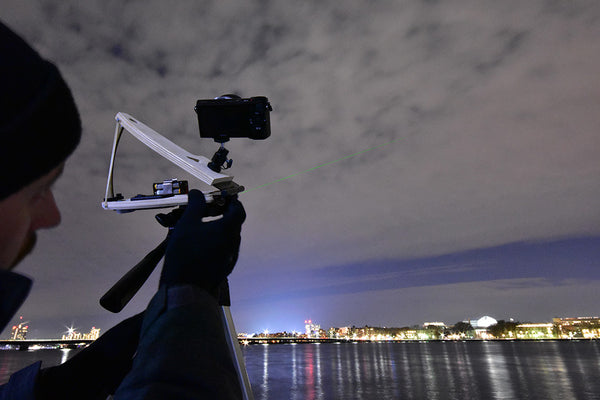
Any astrophotography tracking mount must align its axis of rotation with the polar axis of the earth. The Nyx Tracker comes with an alignment laser that is tested to be aligned with its own axis of rotation to within 0.2 degrees - no adjustment is necessary after purchase.
Using a star map or an app such as Stellarium is a good way to locate the celestial pole for your hemisphere. [4] A successful imaging run will align the laser to within roughly one fifth of your pinky finger held at arm's length.
A two-step alignment works best with the Nyx Tracker: roughly align the tracker before setting up your camera framing, aperture, exposure, and ISO settings. Then once your camera is ready, take the time to precisely align the laser to the celestial pole before beginning your imaging run.
Camera Settings
Four camera settings are important when doing astrophotography: exposure length, aperture (f-stop), ISO, and focus.
Exposure:
When taking pictures of the stars without a star tracking mount, astrophotographers use the "500 rule" to calculate exposure times before star trailing becomes apparent. For example, if using a lens with a 50mm focal length, the exposure should be less than 500 / 50 = 10 seconds, otherwise you will get star trails. [5]
The table below is the recommended starting point for exposure times when using the Nyx Tracker. It is based upon a "2500 rule." With exceptionally good alignment and stability I have been able to far exceed these exposure times (10 minutes at 12mm, effectively a 7000 rule), but I don't recommend the novice pushes it until they familiarize themselves with the entire astrophotography process and the tools used, including the Nyx Tracker.

Aperture:
The more photons that hit your sensor, the better. So a wide open aperture is best. However, all camera lenses have aberrations - manufacturing errors that make images distorted. This is especially pronounced at low f-stops (wide open apertures). If your lens has a variable aperture, stop down one or two stops and you'll likely see a significant reduction of aberration, especially at the edges of your images. So if you have an f/1.8 lens, stop down to f/2.0 or f/2.2 for better images. Of course, this will let in less light, so be prepared to compensate with higher ISO or a longer exposure.
If you are in the market for a new lens, look into a manual focus "prime" lens with a low f-stop, ideally less than f/2.0.
ISO:
Generally, the lower the ISO setting, the less noise will be produced in your image. However, lowering the ISO reduces the sensitivity of the sensor to incoming light, so it's a balance. Ideally, you want your images' histograms to be as far to the right as possible without any clipping.
We recommend starting with 1600 ISO, then lowering the ISO and increasing the length of exposure as much as possible. Users producing the best images with the Nyx Tracker typically image at 800 ISO or less.
Focus:
Countless imaging sessions have been ruined due to improper lens focus. Often, it's difficult to see that an image is out of focus on a small camera screen, so make sure to zoom in to individual stars and check! It helps if your camera is set to manual focus mode so that it doesn't change without the user knowing. Some astrophotographers will fix their lens focus by putting a piece of masking tape on the adjustment ring.
Post-Processing
Most astrophotography images are "stacked" together to increase the signal to noise ratio. That requires aligning the images to each other and then adding the pixel values to bring out features that would not normally be visible.
Once the images are aligned and stacked, "stretching" the histogram is usually the next step in creating good images. Dr. Roger Clark's astrophotography website is one of the best resources for getting the most out of your data. Check out his free color stretching tool, rnc-color-stretch (this is an advanced processing tool and requires some tech savviness).
Lastly, finishing touches are applied to bring out the most in an image. The number of tips and tricks are limitless, and beyond our scope here. Google will lead you to many wonderful tutorials.
Some often-recommended software:
- Photoshop (can both stack and process)
- DeepSkyStacker aka DSS (for stacking only, FREE)
- PixInsight (can both stack and process)
Videos
How to Use the Nyx Tracker
Nyx Tracker Comparison
How to Assemble the Nyx Tracker DIY kit
The now obsolete 3rd/4th Gen assembly video is here.
Footnotes
[1] Note that most entry-level cameras use "crop sensors," so the effective focal length is 1.5 times the focal length labeled on the lens. For example, if using a 20 mm lens with a crop sensor, the effective focal length is 20 x 1.5 = 30 mm. Full frame sensors, although more expensive, always produce better images. Not only do they have higher resolution, but each individual pixel is usually ~2x as wide. This quadruples the area and increases "full well capacity" by a similar factor. This means your signal to readout noise ratio will also be 3-4x better.
[2] Each time you take a new picture you introduce noise from the camera electronics. By taking longer images, you capture more photons from space without introducing more noise.
[3] Other limiting factors include tracking errors (such as periodic error) intrinsic to the equipment's performance, the sensor's well depth, thermal noise, and similar. While these aspects may be important when selecting equipment to purchase for the advanced user, for most beginners they are not the greatest concern.
[3a] It takes a few seconds for a tripod and tracker to stop wobbling after you press the shutter button - use the 10s timer feature to begin the exposure after everything is settled, or consider getting a remote trigger such as an intervalometer.
[4] Note that the northern hemisphere pole is not precisely marked by Polaris (the north star), a common oversight. It is separated by roughly half a degree, the diameter of the moon!
[5] Keep in mind that this is a rule of thumb, and if your target field of view is far from the poles, exposure time should be shorter.
Good luck in your photon capturing, I wish you the best cloud-free skies!!